
Cayenne Radio Installation Instructions for 2004-2010

Compatible vehicles:
Porsche Cayenne 2002-2010
Radio Size:
Cayennes ship with both double DIN size radios as well as single DIN size radios. This radio Kit will allow for a double DIN size radio to be installed into either.
Retains:
- Factory Subwoofer
- Factory Amplifier
- Factory Audio Controls on Steering Wheel
Factory Radio Removal
1. Remove the plastic trim that surrounds the radio.
This is done by inserting a soft plastic pry tool between the trim and the radio console. It is easiest to start at the bottom near the climate controls and work your way around the top. The trim is quite secure. Once you get part of it to come loose, the rest will come off easily. 

2. Remove the torx screws that hold the radio in place
If your vehicle has a pocket below the radio, remove it as well.
3. once the radio is loose, unplug the antenna, fiber optic lines, power, and speaker connectors

Installing Navigation and Satellite Radio Antennas
1. Remove the plastic cover above the gauge cluster.
This is done by inserting a soft plastic pry tool in the top center and pulling down.  Next pry the outside corners of the panel up and over the panel that is below.
2. Remove the 5 torx screws that hold the top of the cluster pod onto the dash
4 of these screws are easy to see, but one is all the way at the back. You will need a long extension to reach this. 
3. Mount Satellite Antennas
Satellite antennas (Navigation, SiriusXM) can be mounted here. The plastic material and glass windshield are transparent to the antennas and will not cause interference with reception. For best performance, the antennas should be mounted to a metalized plate (Included). The metalized plate has a self adhesive backing. Clean the mounting surface and adhere metalized mounting plate. Antennas are magnetic and will stick down to the metalized plate. Angle the metalized plate so that the antenna(s) point straight up. 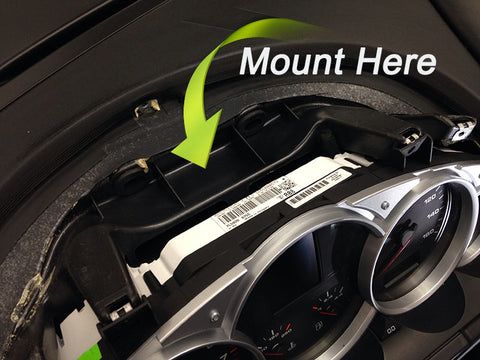


Route the antenna wire down to the radio cavity. A long ziptie makes this a quick and easy task. 
Ideally you want all of the connections for the radio to be about the same length in the radio cavity. Just long enough so that you can make all of the connections, but not excessively long so that you have a bunch of stuff to manage when it's time to put the radio in place. For the satellite antennas you want to put the extra length up where the antennas are mounted. Run the antenna wire back and forth in an 8" pattern and tape tightly together. Important: do not leave the wire in a circle! The antenna will not have good reception if it forms a repetitive circle. You want the antenna to run back and forth (as pictured) in opposite directions so that the signal does not "gain" on itself. In a circle, the signal is all traveling in the same direction (bad).

Note: the antenna bundle shown in the picture is resting on top so that you can see how the wire should be bundled. The bundle should be tucked down behind the cluster.
Installing the Bluetooth Microphone
1. Mount the microphone to the headliner near the dome light.

2. Tuck the microphone wire in along the headliner
above the windshield running it towards the drivers side "A" pillar. Be sure to tuck the wire back far enough that it will not come loose later.
3. Remove the "A" pillar
Pry the airbag badge off, and remove the Torx bolt behind it. Once the fastener has been removed, pull the pillar towards yourself and pull it out from the dash.
4. Run down the pillar along the factory wire harness.
Ziptie along the factory wire harness. 
5. Remove the dash side panel
Use pry tool to remove. 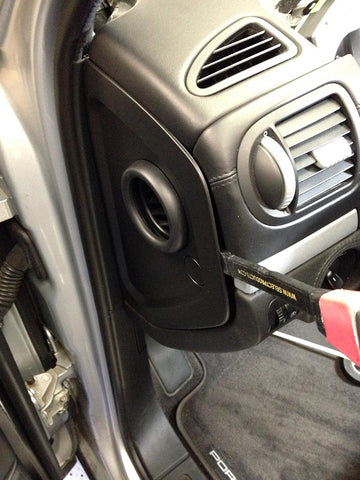

6. Use a long ziptie to pass the microphone wire through the dash and above the gauge cluster.

Once above the cluster, use the same ziptie to pass the wire to the right and down to the radio cavity. Just like the satellite antennas, you can bundle up the excess wire above the gauge cluster. You want to end up with about the same length for all connections in the radio cavity. This will make mounting the radio much easier.
Wiring the Radio
Your radio kit comes with an interface module that has been largely pre-wired for you. There is however a single connection still needs to be made in the vehicle.
12 Volt Accessory (Red)
This circuit supplies the radio with 12 volts only when the vehicle is on. A "T-Tap" type connector has been included in the kit. Connect the red wire to the Black wire in the vehicles PSM button located above the radio location. Once connected, reinforce the connection with a small zip tie.
Note: If installing a camera system, the camera will also require 12 volts accessory power as well. Make those connections here at the same time.
Mounting the Radio
1. Mount the Side Brackets
Included in your kit are two metal side brackets with adjustable spring loaded clips. Note that the adjustable clips make it possible to adjust how far back inside the dash kit the radio will sit. Mount the steel radio sleeve in the dash kit and test fit the radio with the side brackets bolted on with the entire assembly out of the vehicle. Adjust the position of the copper side clips to obtain proper mounting depth. You want the face of the radio to stick out about 1/8th - 1/4" past the plastic radio trim ring.
2. Mount the Radio Assembly in the Dash
Cover your center console with a towel to protect it from becoming scratched or marred while you install your radio. A second person holding the radio while you plug in all of the connections can make the job go faster.
- Plug HUR Interface Module into vehicles wire harness and tuck the unit behind the plastic barrier to the right of the radio cavity. You want to get the factory radio harness and the HUR module tucked outside of the radio cavity. The radio will consume all of the room in the radio cavity.
- Plug all Four Audio RCAs into the radio.
- Plug in the FM antenna
- Plug in the Satellite Radio Antenna (If using satellite radio)
- Plug in the Navigation Satellite Antenna
- Plug in the backup camera inputs (yellow RCA)
- Plug in the 3 pin Parking Brake Harness (Kenwood)
- Route the USB cables to desired location(s) and plug into radio
Once everything is plugged in, slide radio into place and secure with the four Torx screws that you removed from the original radio.
Testing
- Power up radio and follow on screen setup instructions
- Check that you have volume
- Check that fader and balance is proper
- Check that FM reception is good
- Check that the backup camera engages when vehicle is put into reverse. Also check that the image is correct from left to right.
- Check that the navigation shows your location properly (vehicle needs to be outside with a clear view of the sky).
- Check that the USB works properly
If all looks good, then reassemble all trim panels.